Navigation Essentials by Nigel Williams
Navigation Essentials
Britain has the best mapping in the world but still teaches the subject based on an 80 year old methodology which stems from the Military introducing grid lines in 1936. Plotting trenches, directing artillery and communicating that information with great accuracy was paramount. Using Mils – 6,400 to a circle, instead of degrees, (an angle of 1 Mil measures one metre at the distance of a kilometre), that level of accuracy explains why magnetic variation seemed important. Hill walking was not in their thinking.
Much of that is an un-necessary complication for the hill walker or youngster learning to navigate. Being able to work out a grid reference has never helped anyone navigate a route. Magnetic variation in the UK is so close to zero for the next couple of decades that it is irrelevant. Hill walking compasses are marked in 2 degree units, how accurately one takes a bearing, keeps the needle aligned and walks on the bearing is likely to negate any benefit of trying to adjust for magnetic variation. Knowledge of these things is good but not essential to navigating a route in the UK hills. So what are the essentials of navigation?
Get organised & plan your route
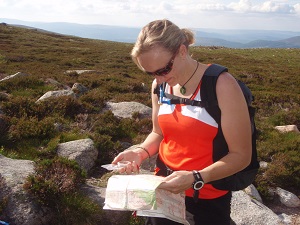
Spend time studying the map and planning a route, linking line features (including contour features) to create a handrail to follow. Try to visualise the ground, know what to expect and see. Identify key points along the way and make some rough timings for each section.
Have the map and compass readily available and easy to use, ideally in a pocket. Waterproof and fold the map to the area being walked (about A5 size) and have the compass available to be held on the map with one hand so the two items are used as one.
Map and compass hung around the neck tends to compromise the core skill of map setting. Be able to hold them in a comfortable position for ease of reading and so that they can be held up near arms length at eye level to accurately align features on the ground with the map and visa versa.
Compasses come with a loop of cord, undo it then make a loop at each end just big enough to thread the compass through, attach one end to the compass the other end to a pocket zip. Alternatively double the length of the cord to make a large loop that will go over your head and shoulder, it can then be kept in any pocket and there is less faffing if you change a layer of outer clothing.
Measuring distance
Learn to gage the scale, on OS and Harvey maps, across one map square is 1km (1.5km diagonally). If you walk at 4km per hour it will take 15 minutes to cross a square. Add a minute for each contour crossed going uphill. Treat downhill as being on the flat.
Pacing is accurate over short distances, although rarely needed it helps develop a sense of the map scale, 100m is 2mm on a 1:50,000 or 4mm on a 1:25,000. Time how long it takes to pace 100m and multiply by 10 to work out your speed. 1min.30secs is 4kph, 2mins is 3kph. The ability to work out current speed is a useful safety management tool. If conditions or blisters are slowing the pace it enables a decision to be made about when to turn around or call home with a revised ETA in the middle of the day rather than at dusk.
Contours, the 3rd dimension
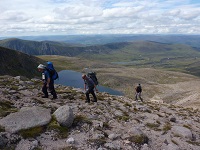
Contours account for about a 3rd of information, probably 2/3rds in winter. Ignoring them leaves one making decisions with about 65% of the information available. We feel contours rather than see them, with eyes shut most people can tell whether they are going uphill diagonally left or right, straight up or down, contouring etc. Look at the contours on your chosen route and think about how your direction of travel across them should feel, what angle are you crossing them at? Can you see or feel that?
Look for linear features that the contours describe such as changes in steepness, ridges, slope aspect and changes in slope aspect. This can help with route choice, and planning strategies such as catching features and attack points.
Keeping the map set
Put the compass on or next to the map turn the map until the red end of the compass needle points to the top of the map where the title would be, (the needle will align with the north south grid lines). Keeping the map set, move your body around the map until you are facing in the direction of your planned route. Continue to keep the map set as you walk. There is no need to turn the dial or align the compass in any way. Having the map set in front of you simplifies the job of keeping track of where you are. If the map is put away you are more likely to need good relocation skills, yet this is an area of skills that is often least understood or practiced effectively.
A rough bearing
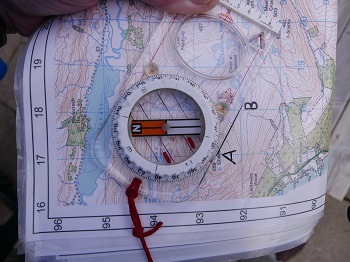
For most situations a rough bearing will provide sufficient accuracy even in poor summer visibility, the process is similar to map setting. Place the edge of the compass on the map from A to B along the proposed line of travel. Ensure the base plate with the direction of travel arrow points straight ahead, your body should be square behind it. Grip the compass on the map and turn your whole body slowly round until the red end of the needle points to the top of the map. Then look up and the base plate will point exactly along the direction of travel, in reality this is just a slightly more accurate version of map setting and provided the compass remains on the map with the red end of the needle pointing to the top, allows one to aim on objects ahead so you can walk in on the bearing.
There is no need to turn the housing and have the needle point to the N on the dial (sometimes referred to as getting “red Fred in his shed”) unless you want to communicate a bearing to someone else or lift the compass off the map. This will seem strange as most of us have been taught to turn the dial and use the compass off the map, but this is how orienteers navigate quickly and efficiently. It is surprisingly accurate which perhaps illustrates that accurate bearings (turning the housing etc.) are not as accurate in practice as we think. However an accurate bearing at night or in bad weather is reassuring and the bearing is recorded on the dial should the map and compass be separated.
Tactical techniques
There are other simple tactical techniques around planning individual navigation legs using “attack points”, “aiming off”, “catching features” and “boxing” or “dog legs” which are well documented but perhaps secondary to the essentials.
Relocation skills
We all get lost or cartographically challenged. Develop a sequence of skills and understand that the problem cannot be resolved stood still, you have to “travel to unravel” or “move to prove” your location.
- Set the map, remaining calm (food and drink may help) and make a plan are the first steps.
- If on a linear feature e.g. path, stream, ridge etc. does it align with one on the map? Sometimes there are several options. Follow the feature, usually it will change direction or create a junction with another linear feature that should be identifiable on the map.
- Lastly if you are on a hill side it will face a certain direction (aspect), just use the compass needle to help you work out which direction the slope faces looking out. It won’t tell you how high up the slope you are but if you are on a slope facing north for instance you can eliminate all slopes on the map facing east, south and west. Again there may be several possibilities requiring travel for further evidence. Ideally get onto a line feature and follow that to an identifiable point as in 2 above.
Forget back bearings on church spires and drawing “cocked hats” on the map, it was largely a ploy to keep you in the classroom! If you can identify things you see around you, you’re not lost.
Practice for confidence
A wise navigator once said that “Navigation is 25% map work, 25% compass work and 50% confidence in the other two”. The individual skills of navigation are easy however a lack of confidence often creates doubt in our minds.
Orienteering provides a way to build confidence in a relatively safe environment, offering repeated practice to help ingrain the skills and strategies. Courses are colour coded for difficulty to match skill or confidence levels. Go online to find clubs around the country that run low level public events, no need to run, wear lycra or be a member, just turn up and pay for the map. The experience will complement your hill skills.